部署hexo到阿里云服务器
[TOC]
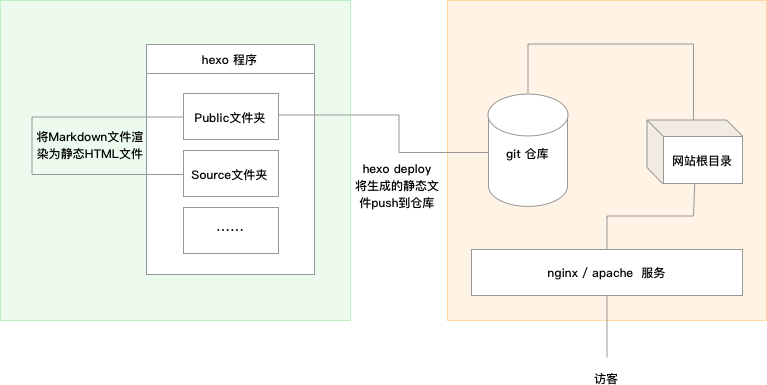
先搞明白Hexo博客从搭建到自动发布的架构,才能更好的理解我们每一步进行的操作。不然只跟着步骤过了一遍,却不知道为什么这么做。

搭建流程
第一步: 安装node.js以及本地Hexo初始化
第二步: 服务器环境搭建,包括安装 Git 、apache配置 、创建 git 用户
第三步: 使用Git自动化部署发布博客
本地环境
略
服务器
安装git
- 安装git
|
|
- 检查版本
|
|
- 创建git用户
|
|
- 配置权限
|
|
找到以下内容
|
|
在下面添加:
|
|
保存退出后改回权限:chmod 400 /etc/sudoers
然后给新加的用户git设置权限,编辑/etc/passwd将:git❌1003:1003:,,,:/home/git:/bin/bash 改成:git❌1003:1003:,,,:/home/git:/usr/bin/git-shell 这样git就只能使用git-shell而不能使用bash。
-
git服务器打开RSA认证 vim /etc/ssh/sshd_config 在sshd_config中开启以下几项:
1 2 3RSAAuthentication yes PubkeyAuthentication yes AuthorizedKeysFile .ssh/authorized_keys -
随后设置Git用户的密码
|
|
配置ssh
切换至git用户,创建 ~/.ssh 文件夹和 ~/.ssh/authorized_keys 文件,并赋予相应的权限
|
|
- 然后就可以执行ssh 命令测试是否可以免密登录
ssh -v git@SERVER至此,Git用户添加完成
创建仓库
执行命令:sudo git init --bare hexo.git
使用–bare 参数,Git 就会创建一个裸仓库,裸仓库没有工作区,我们不会在裸仓库上进行操作,它只为共享而存在。
改变 hexo.git 目录的拥有者为git用户:sudo chown -R git:git hexo.git
配置钩子
目录说明
/opt/GitRepos/hexo.git = git仓库所在目录 /opt/StaticWeb/hexo = 静态网站存放目录
实际执行时将对应目录替换成您自己的目录
在 /opt/GitRepos/hexo.git/hooks 目录下新建一个 post-receive 文件,在文件中写入如下内容:
|
|
写入以下内容
|
|
给post-receive 执行权限
|
|
post-receive 的 git 命令可以在我们每次 push 完之后,把部署目录更新到博客的最新生成状态。这样便可以完成达到自动部署的目的了。